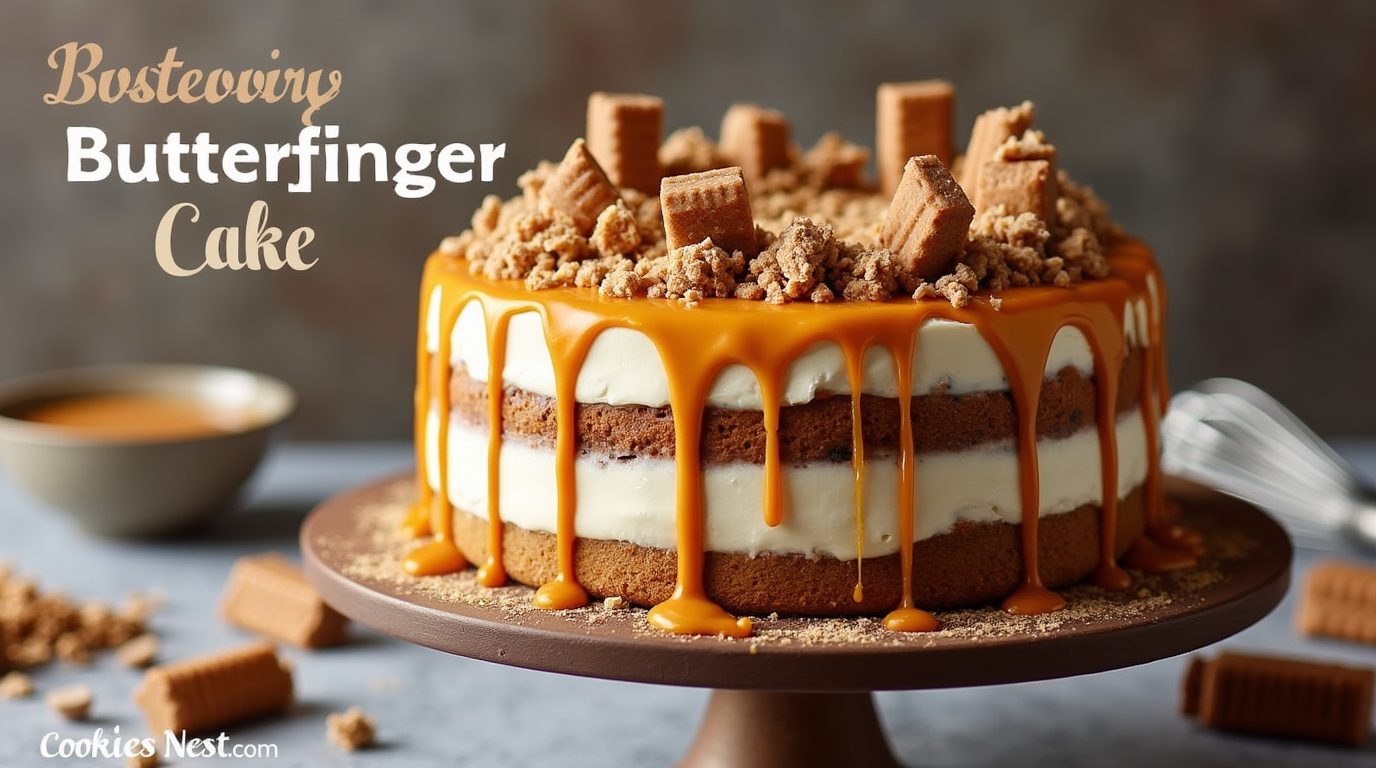
Butterfinger Cake: How to Bake the Best in 7 Steps
Have you ever wondered how to take your favorite candy bar and turn it into an irresistible dessert? If you love the crunchy, peanut buttery taste of Butterfinger candy bars, you’re in for a treat! This Butterfinger cake combines all the flavors you adore into a moist, delicious cake that’s easy to make. Let’s dive into this delightful recipe that’s sure to become a family favorite.
Table of Contents
Why This Butterfinger Cake Is Special
This recipe stands out because:
- Easy to Make: With just 7 simple steps, even beginners can bake this cake successfully.
- Delicious Flavor: Combines moist chocolate cake with creamy caramel and crunchy Butterfinger pieces.
- Quick Preparation: Requires minimal prep time, so you can enjoy it sooner.
- Versatile: Perfect for birthdays, holidays, or any day you want a special treat.
Total Time Required: Approximately 1 hour Difficulty Level: Easy
Essential Ingredients
To make the best Butterfinger cake, you’ll need the following key ingredients:
Key Components
- Chocolate Cake Mix (1 box): Forms the base of the cake. You can use your favorite brand.
- Eggs, Oil, and Water (as per cake mix instructions): Needed to prepare the cake mix.
- Sweetened Condensed Milk (1 can, 14 oz): Adds sweetness and moisture.
- Caramel Topping (1 jar, about 16 oz): Provides a rich caramel layer.
- Butterfinger Candy Bars (4 full-size bars): Crushed to add crunchy texture and Butterfinger flavor throughout.
- Whipped Topping (1 container, 8 oz): For a light and creamy frosting.
Substitutions and Variations
- Homemade Cake: Substitute the box mix with your favorite homemade chocolate cake recipe.
- Alternate Candy Bars: Use other candy bars like Snickers or Heath Bars for a different flavor.
- Whipped Cream: Make homemade whipped cream instead of store-bought whipped topping.
Step-by-Step Instructions
1. Prepare the Cake Batter
- Preheat your oven to 350°F (175°C).
- Grease a 9×13 inch baking pan with cooking spray or butter.
- Mix the cake batter according to the instructions on the box. Combine the cake mix with the eggs, oil, and water in a large bowl. Stir until smooth.
2. Bake the Cake
- Pour the batter into the prepared baking pan.
- Bake in the preheated oven for 25-30 minutes, or until a toothpick inserted into the center comes out clean.
3. Poke Holes in the Cake
- Remove the cake from the oven and let it cool for about 10 minutes.
- Using the handle of a wooden spoon or a straw, poke holes all over the cake, spacing them about an inch apart.
4. Add Sweetened Condensed Milk and Caramel
- Pour the sweetened condensed milk evenly over the warm cake, allowing it to soak into the holes.
- Drizzle the caramel topping over the cake in the same way. Reserve a small amount of caramel for decorating later if desired.
5. Sprinkle Crushed Butterfinger
- Crush 2 of the Butterfinger candy bars using a rolling pin or by placing them in a zip-top bag and smashing them gently.
- Sprinkle the crushed candy bars evenly over the cake.
6. Add Whipped Topping
- Allow the cake to cool completely, about 30 minutes.
- Spread the whipped topping evenly over the entire cake using a spatula.
7. Final Touches
- Crush the remaining 2 Butterfinger candy bars and sprinkle them over the whipped topping.
- Drizzle any remaining caramel topping over the top for extra flavor and decoration.
Assembly and Presentation
- Serving Suggestions:
- Cut the cake into squares and serve on dessert plates.
- Optional: Add a scoop of vanilla ice cream on the side.
- Presentation Tips:
- Use additional crushed Butterfinger pieces to decorate each slice.
- Drizzle chocolate syrup alongside caramel for a richer look.
Storage and Make-Ahead Tips
- Refrigeration: Store the cake covered in the refrigerator for up to 5 days.
- Make-Ahead: You can prepare the cake a day in advance. Simply wait to add the final Butterfinger topping until just before serving for maximum crunch.
- Freezing: Although possible, freezing is not recommended as the texture may change.
Recipe Variations
- Peanut Butter Lover’s Cake:
- Add 1 cup of creamy peanut butter to the cake batter for extra flavor.
- Double Chocolate Butterfinger Cake:
- Use a devil’s food cake mix and add 1 cup of chocolate chips to the batter.
- Butterscotch Twist:
- Substitute caramel topping with butterscotch sauce for a different taste.
- Mini Butterfinger Cupcakes:
- Prepare the batter and bake in cupcake liners. Follow the same steps for soaking and topping.
Conclusion
There you have it—the best Butterfinger cake baked in just 7 simple steps! This cake is sure to delight friends and family with its rich flavors and satisfying crunch. Whether you’re a seasoned baker or just starting out, this recipe is easy to follow and yields fantastic results. So why not give it a try and add a sweet touch to your day?
Frequently Asked Questions (FAQs)
Q: Can I use a different flavor of cake mix?
A: Yes! A yellow or vanilla cake mix can also work well, giving you a slightly different but delicious flavor.
Q: Do I have to use sweetened condensed milk and caramel?
A: While they add moisture and richness, you can choose one or the other if you prefer. Using both gives the cake its signature gooey texture.
Q: Can I make this cake in advance?
A: Absolutely! Preparing it the day before allows the flavors to meld together even more. Just add the final topping of crushed Butterfinger before serving.
Q: Is there a healthier version of this cake?
A: You can use a sugar-free cake mix, light whipped topping, and reduced-sugar caramel sauce to cut down on calories and sugar.
Q: How do I store leftovers?
A: Cover the cake with plastic wrap or store in an airtight container in the refrigerator for up to 5 days.